
Miniature: Heroquest Zombie (Fred)
I had the Heroquest board game when I was about 12 and loved the absolute guts out of it. Not just the playing but especially painting up the models. Buying a second hand copy of it today is difficult (not to mention quite pricey sometimes - although I do read the game is being revised again soon!) but with a bit of a search, you can find STL models of the game pieces!

So what better way to see how miniatures go than by printing out the Heroquest Zombie model and seeing how it comes out? I set things up, hit print and got set for a big trip down memory lane..
WHY THE ZOMBIE?
From memory this was one of my better efforts of painting back 28 years or so ago so why not give it another spin now? This is the original effort from 1989:
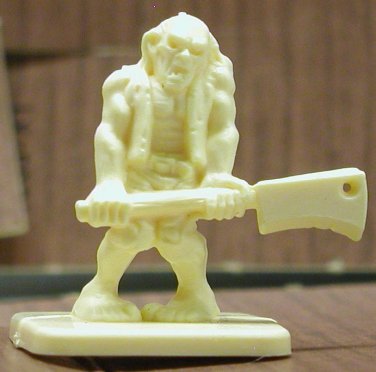
And hilariously, I found this up on eBay for $10. Wow. To 3d print up a replica of this moaning, shambling bad boy would cost you less than 50 cents depending on your setup and materials. Not to mention you can do as many as you like if you don't like the size or your painting efforts (mine are very rusty so this could be interesting.)
MNNNNNNNNNNGGGGGGGGHHHHHH! I MEAN, TIME TO PRINT

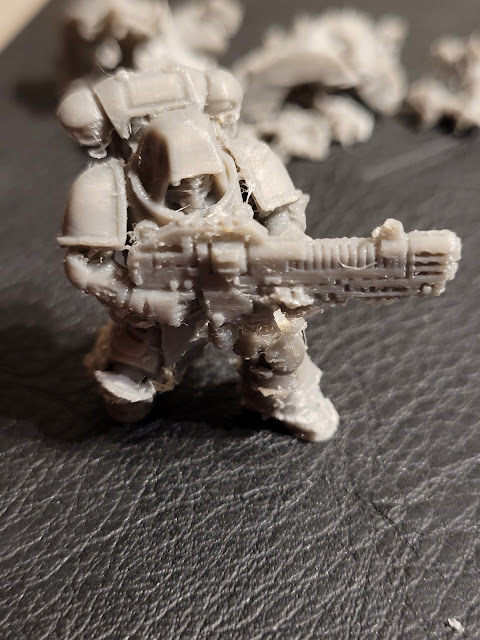
And a few minutes post printing, we hit our first problem in that removing the supports also removed Fred, Eater of Brains from his own feet. I had them set to everywhere where the touching base plate option probably would have worked a little better. White is also not the best choice for something this small as it makes it hard to see any imperfections compared to darker colors.
Also I don't have a Heroquest board handy to measure but I suspect he's a little smaller than he should be. Plus the print lines are pretty obvious (and you will see that when painted) - I was just using the stock standard settings from the Cura slicer. Since then I've found some very handy miniature settings for Cura that you can import that should hopefully come out a little cleaner.
To glue Fred back together, I used some Gorilla Glue two-part epoxy I had in the shed which was suggested on another page but the results weren't great. After a day of drying in the shed, he's still got a little bit of flex. As long as nobody is too rough with Captain Cleaver here, we should be okay but next time I'm switching to superglue.
BRRRRRAAAAAAAAAIIIIIIIINNNNNNNNNS! I MEAN, TIME TO PAINT
Foolishly my airbrush in the shed is still suffering from a mean case of 'hasn't been cleaned properly for a while' and since I was using enamels, it's pretty jammed up. So my thoughts of airbrushing a black base coat on Fred went right out the window and I reverted just using a small brush and some Abaddon Black Warhammer paint. This worked but wasn't great so I'd suggest a spray of primer first, not only to help with filling out some of those lines but also to have a better layer to paint over.
To amuse myself through our latest lock down (don't get me started) I picked up the D&D Nolzurs Marvelous Pigments Undead Paint Set (similar to this one - Amazon link) which is perfect for Fred's..I mean the undead although I found some colors work better than others. The Mouldy Wash that comes with it really darkens it up and makes it look filthy which is handy but remind me to find a few more browns for my collection and get better at highlighting.

Also his feet aren't supposed to be boots, they're meant to be flesh. At this size and with white, I didn't even realize. Still for something I haven't done for a while, I'm happy with starting efforts!

Those lines only appear up close making him look like he's a projection rather than something that crawled out of a dungeon or graveyard somewhere. When I get a much smaller brush I'll do something with his mouth and fill in his blazing eyes a little better.
Still, we've got to start somewhere!

WHERE TO GET IT: Cults 3D (Free)

Comments
Post a Comment